Tuesday, December 19, 2017

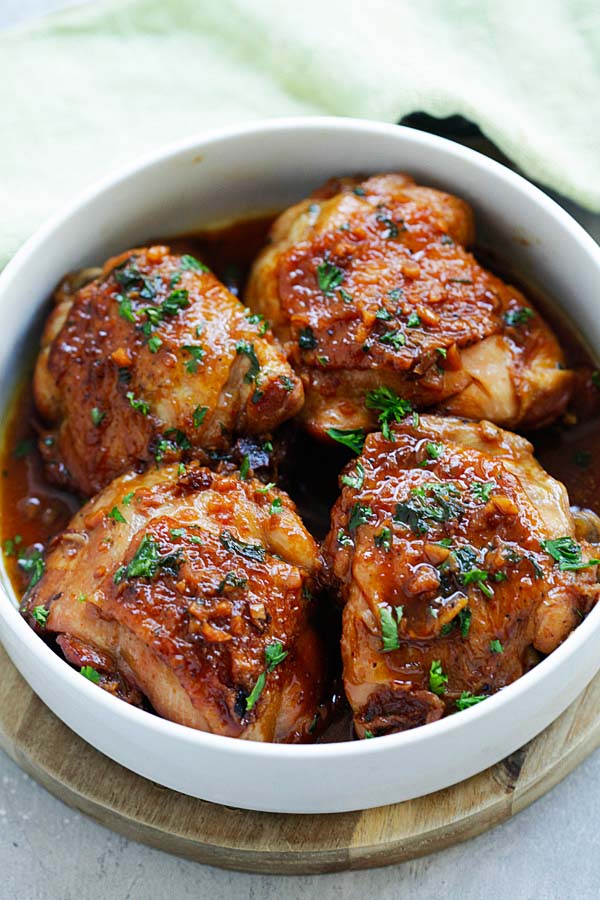
Instant Pot Honey Garlic Chicken

Honey Garlic Chicken - moist, tender, fall-off-the-bone chicken thighs in savory and sweet honey garlic sauce and made in an Instant Pot, so delicious | rasamalaysia.com
Ingredients:
Salt
Ground black pepper
1 tablespoon cooking oil
1 1/2 lbs (4) chicken thighs
4 cloves garlic, minced
Chopped parsley, optional
Sauce:
3 tablespoons honey
1 teaspoon sugar or brown sugar
2 tablespoons soy sauce
3 tablespoons water or chicken broth (preferred)
3 dashes cayenne pepper

Wash and rinse the chicken thighs with cold water. Pat dry with paper towels. Season the chicken thighs with salt and pepper. Set aside. Mix all the ingredients in the Sauce together, stir to mix well. Make sure the honey and sugar are completely dissolved. Set aside.
Turn on the Saute mode on your Instant Pot. As soon as the pot is heated, add 1/2 tablespoon of the cooking oil. Pan sear the chicken thighs (skin side down first) until both sides turn nicely brown. Add the remaining cooking oil and saute the garlic a little bit. Pour in the sauce and cover the lid. Cover the pot and select Manual and set to High pressure for 10 minutes.
When it beeps, turn to Quick Release. When the valve drops, remove the lid carefully, add the chopped parsley and serve immediately.
.

Sunday, December 17, 2017

Seafood Boil in Instant Pot

Image may contain: people sitting, table, food and indoor

http://www.greatchowtv.com/2015/07/30/seafood-boil-jumbo-shrimp-crab-legs-sweet-sausage-corn-on-the-cob-and-red-potatoes-its-amazing/

SEAFOOD BOIL WITH INSTANT POT – JUMBO SHRIMP, CRAB LEGS, SWEET SAUSAGE, CORN ON THE COB AND RED POTATOES – ITS AMAZING !!!

WELCOME BACK TO GREAT CHOW !!! THIS IS GREAT CHOW’S INSTANT POT SEAFOOD BOIL

Splash ScreenCapture2
This time I wanted to show everyone how to make a very easy, super delicious seafood spectacular! I have put together an amazing Seafood Boil with large to jumbo shrimp, snow crab legs, sweet fennel sausage, sweet corn on the cob and soft red potatoes that are pressure cooked to perfection – Its Amazing !!!  I will show you the flavoring process as well as the content layer process from beginning to end using the Instant Pot Pressure Cooker. The amazing recipe, directions, images and full-length video are below !!!  It’s excellent for all year round, sporting events(and tailgating), parties, get-together’s, weekend feasts or even during the week because it’s so simple.
Seafood Boil Capture2

IN THIS EPISODE:

In this episode, we examine the all of the tasty ingredients that are used in a Southern Style Seafood Boil. I also take you on an amazing fishing experience so we can get our tasty Shrimp and Crabs (our tasty treasures of the sea). We review the flavoring of our seafood boil liquid that includes Zatarains (New Orleans Traditional) Shrimp and Crab boil and the Classic Old Bay Seasonings. I also show you how to make a fantastic flavor sachet; contents include garlic, lemon, sage, bay leaves and thyme wrapped in cheesecloth and submerged in the flavored liquid. We also explore the layering process when adding our red potatoes, corn on the cob, sweet fennel sausage, snow crab legs and large with jumbo shrimp.
Looking to get an Instant Pot Pressure Cooker seen in this episode? Just click HERE for the Great Chow link on Amazon:      http://goo.gl/uOhBM3
\\\\   https://www.youtube.com/watch?v=VZ0R66OfzwM ////

RECIPE AND DIRECTIONS FOR SEAFOOD BOIL

Please note:  This is an excellent baseline recipe for everyone. If you like spicier or less spicy foods you may adjust to your liking. The Zatarain’s Shrimp and Crab boil is the spicy ingredient in this recipe, BUT for this recipe, I only use 1 tablespoon so that it is a very mildly spicy boil so that everyone can enjoy.
Our Seafood Boil Flavor Liquid:
  • 6 cups water. (You can use the measurement markings on Instant Pot to make the measurement easy for you).
  • 1 tablespoon Zatarain’s shrimp and crab boil concentrate.
  • 2 tablespoons Old Bay seasoning
  • 1 tablespoon kosher salt
  • 1 tablespoon paprika
  • 3 lemon wedges(squeeze some lemon juice in too!)
  • 2 quarters of an onion (suggestions: Spanish Onion or Vidalia)
  • 1 Flavor sachet (ingredients right below)
The flavor sachet is composed of:
  • 1 cheesecloth cut into a large square, and one piece of string or butcher twine to tie the knot.
  • 1 thick slice of lemon
  • A garlic bulb cut in half
  • 2-3 sprigs of thyme
  • 2 sage leaves
  • 2 bay leaves
Add all contents to the cheesecloth and tie up with a piece of string or butcher twine (ask in the grocery store).

Saturday, December 16, 2017

Hamburgers in Instant Pot


The cheese does not stick to the foil. 15 minutes on manual or pressure cook depending on your model. 
I'm sold on the burgers! 2nd time this week and the kids love them. Season, top with your faves, loosely wrap with foil (we use a sharpie to write initials for identification purposes). Into the magic cauldron for 15 minutes and QR. So tasty and clean up is a breeze. No hot grill or oven. 🤩😍

https://www.facebook.com/groups/InstantPotCommunity/permalink/1934979366596042/


🍔


Friday, December 15, 2017

Patton Potato Salad


1 cup mayo in seperate bowl
1/2 cup. relish
1/2 c. add juce to make soupy - thin mixture

sometimes olives or pimentos

6 eggs
10 potatoes
1/2 c. dill relish
1/2 c. pickle juice
1 cup mayo
1 clove garlic
2 Tbsp onion
1 tsp salt
1/2 tsp pepper

Thursday, December 14, 2017

Honey Lemon Curd

https://cookieandkate.com/2016/lemon-curd-recipe/

Delicious lemon curd (honey sweetened!) - cookieandkate.com

Uses for lemon curd:

Honey Lemon Curd

  • Author: Cookie and Kate
  •  
  • Prep Time: 10 mins
  •  
  • Cook Time: 15 mins
  • Total Time: 25 minutes
  •  
  • Yield: 2 cups
  •  
  • Category: Dessert
★★★★★
5 from 15 reviews
Meet the perfect lemon curd recipe. This classic lemon curd is made even better with honey, and it’s so easy to make—no straining required! Recipe yields 2 cups of curd.

INGREDIENTS

  • 4 tablespoons unsalted butter, diced into ½” cubes
  • ⅓ cup honey
  • 4 large egg yolks
  • 2 large eggs
  • 1 tablespoon finely grated lemon zest
  • ⅔ cup fresh lemon juice (from around 4 large or 8 small lemons)

INSTRUCTIONS

  1. In a medium bowl, combine the cubed butter and honey. Starting on a low speed and working up to higher speeds, cream the mixture until fluffy. I used a handheld mixer for this.
  2. While beating the mixture, slowly add the egg yolks and eggs. Then, add the zest and lemon juice to the bowl and blend again. It will look curdled at this point, but don’t worry!
  3. Pour the mixture into a medium-sized, non-reactive saucepan (stainless steel or enameled cast iron should work great). Cook over medium-low heat while stirring constantly with a rubber spatula or wooden spoon (it’s important to stir constantly throughout the cooking process, which will take somewhere between 10 to 20 minutes).
  4. Once the mixture starts looking smooth and shiny, slowly increase the heat to medium. Continue cooking until the mixture has thickened and your spoon meets resistance as you stir, which happens right at the brink of boiling. Once the mixture is trying to boil, cook for about 15 more seconds while stirring constantly, then remove from heat. The curd will thicken up more as it cools.
  5. Let the curd cool before transferring it to an airtight container and screwing on a lid. Store in the refrigerator for about 1 week, or in the freezer for up to 2 months. The curd doesn’t freeze solid, so you can scoop out as much as you want right from the freezer!

Wednesday, December 13, 2017

The BEST Freaking Lemon Bars on Earth

https://dandelionmama.com/2010/05/29/recipe-the-best-freaking-lemon-square-bars-on-earth/amp/

You think I’m kidding? I’m not. I swore a long time ago that I would only put up my very best recipes on the blog- and this one is absolutely freaking awesome. And easy too. You will never, ever, buy the ready-to-make box of pseudo-lemon bars again. This one is the be all and end all.

The crust is like shortbread- heck, no- it IS shortbread. Buttery, buttery shortbread. Topped with lemony, lemony, tangy lemon curd. EVEN Bean eats these- he calls them HIS lemon square bars. Make them. Now. Today. And then return and report. I want to hear how they made your knees weak…

Bean’s Lemon Square Bars

Preheat oven to 350 degrees

3 cups all purpose flour
1 1/2 cups powdered sugar
1 1/2 cups of butter (3 sticks) melted completley
Mix flour and powdered sugar together, then pour the butter over the dry ingredients. Mix together gently, until just crumbly. Lightly spray a 9 x 13″ casserole pan (metal with straight sides is best for this) with cooking spray, and then press the crumbs firmly into the pan in an even-ish layer. I like to leave little bumps from my fingers- gives it a rustic texture, but you can do whatever you want. (I also like a thick crust, so if you like it thinner, don’t use all the mix, or make two pans) Bake for 15 minutes at 350.

While that’s baking, make the lemon curd:

6 whole eggs
3 cups white sugar
1 1/2 teaspoons baking powder
1/2 cup flour
1/3 cup FRESH lemon juice. NO skimping with frozen or the squeezie lemon on this one. Don’t do it.
the outer yellow zest from 2 or 3 lemons.
In bowl (I use the same one I made the crust in, just rinsed out) whip the six eggs with a whisk until they are uniform and light. Add the sugar, baking powder and flour, and stir to combine well. With a microplane or small grater, zest only the outer yellow skin from two of your fresh, washed lemons. Probably about 2 Tablespoons. Add tot he egg/sugar mixture. Squeeze the lemons, straining out the pips and  pulp, and add the 1/3 cup of juice.

After 15 minutes, pull the crust from the oven, and immediately pour the curd mixture over the hot crust, scraping the bowl to get all the lemony goodness. Pop it back in the over for 45 minutes, or until set and it doesn’t jiggle in the center.

Let cool COMPLETELY (it will be a mess if you rush it, trust me!) before slicing into neat squares. Dust with powdered sugar, and watch your knees give out as you taste them.

This is one of the foods I miss most from before gluten and my histamines got in a land war.

Tuesday, December 12, 2017

The Best Lemon Loaf (Better-Than-Starbucks Copycat)

https://www.averiecooks.com/2015/01/best-lemon-loaf-better-starbucks-copycat.html#

The Best Lemon Loaf (Better-Than-Starbucks Copycat) - Took years but I finally recreated it! Easy, no mixer, no cake mix, dangerously good!!
YIELD: ONE 9X5-INCH LOAF

TOTAL TIME: ABOUT 90 MINUTES, FOR COOLING

PREP TIME: 10 MINUTES

COOK TIME: ABOUT 50 MINUTES
This is an easy, no-mixer, one-bowl, whisk-together batter. The loaf is soft, springy, and moist without being heavy or dry, nor is it oily. Plus, you probably have all the ingredients on hand to make it and you can pronounce every ingredient used. The cake itself is perfectly lemony, and the lemon glaze boosts the lemon flavor. I used 2 tablespoons of lemon extract because no actual lemon juice is used in the loaf and I found 2 tablespoons of lemon extract necessary for full-bodied lemon flavor, but add to taste. Don’t use lemon oil and lemon extract interchangeably.

INGREDIENTS:

Loaf
3 large eggs
1 cup granulated sugar
1 cup (8 ounces) sour cream or Greek yogurt (lite okay)
1/2 cup canola or vegetable oil
2 tablespoons lemon zest
1 to 2 tablespoons lemon extract, to taste (not teaspoons; and not lemon oil and not lemon juice – see step 4 in directions)
1 1/2 cups all-purpose flour
2 teaspoons baking powder
1/2 teaspoon salt, or to taste
Lemon Glaze
1 cup confectioners’ sugar
3 tablespoons lemon juice, or as necessary for consistency

DIRECTIONS:

  1. Preheat oven to 350F. Spray a 9×5-inch loaf pan with floured cooking spray, or grease and flour the pan; set aside.
  2. Loaf – To a large bowl, add the eggs, sugar, sour cream, and whisk vigorously until smooth and combined.
  3. Drizzle in the oil while whisking to combine.
  4. Add the lemon zest, lemon extract, and whisk to combine. Note – I used 2 tablespoons of lemon extract because no actual lemon juice is used in the loaf and I found 2 tablespoons lemon extract necessary for full-bodied lemon flavor, but add to taste. Don’t use lemon oil and lemon extract interchangeably because they’re not; oil is much more potent and intense. Don’t use lemon juice in place of lemon extract because it’s not strong enough and the acidity can alter the overall results.
  5. Add the flour, baking powder, salt, and stir until just combined, don’t overmix. Some lumps will be present and that’s okay, don’t try to stir them smooth.
  6. Turn the batter out into prepared pan, smoothing the top lightly with a spatula. Bake for about 50 to 52 minutes, or until top is domed, set, and toothpick inserted in the center crack comes out clean or with a few moist crumbs but no batter. In the last 10 minutes of baking, tent pan with foil (loosely drape a sheet of foil over pan) to prevent excessive browning on the top and sides of bread before center cooks through.
  7. Allow loaf to cool in pan on top of a wire rack for at least 30 minutes (I cooled 4 hours) before turning out onto rack to cool completely before glazing.
  8. Lemon Glaze – To a small bowl, add the confectioner’s sugar and slowly drizzle in the lemon juice while whisking until smooth and combined. You may need to play with the sugar and lemon juice amounts a bit as necessary for desired consistency and flavor.
  9. Evenly drizzle glaze over bread before slicing and serving. Extra glaze can be spread on the cut surface of the bread like you’d spread butter on toast and it soaks right in making the bread even moister and more lemony. Or you can halve the glaze recipe if you’re not a glaze person. Bread will keep airtight at room temperature for up to 5 days or in the freezer for up to 6 months; I don’t recommend storing it in the fridge because it’ll dry out.
Recipe Permalink: https://www.averiecooks.com/2015/01/best-lemon-loaf-better-starbucks-copycat.html/2015/01/best-lemon-loaf-better-starbucks-copycat.html/print/